Showing posts with label frosting. Show all posts

Saturday, June 12, 2010

chocolate, raspberry and fudge... how a-maz-ing is that?!


Oh how I heart to bake. Especially cakes. Especially when they turn out and are beautiful and taste delicious... those are great days. Thursday was a great day.

I baked for The Whalesbone's 5 year anniversary party. I was given carte blanche... however was informed that Josh hearts all things chocolate. The more chocolate -- the better.

Done. I knew exactly which cake I was going to make. I've baked this specific cake recipe twice already; once with a peanut butter butter cream and covered in chocolate ganache (yes... you should moan). The second time with a cherry whipped cream filling and then covered in a chocolate fudge frosting (again... sighs or moans are acceptable).

I decided to hit it up with a fresh raspberry butter cream filling and then cover it in the chocolate fudge frosting. Double the chocolate impact, with the bright, tartness of the fresh raspberries to liven it up. S-U-C-C-E-S-S!

I played around with the original recipe (from smitten kitchen) since I was making 3 x 9-inch rounds and not 8-inch rounds. I love love love how this cake turns out... it is so moist (it puts a Betty Crocker or Duncan Hines cakes to shame) and rich... one thing, watch out, it's a little delicate. But don't let that put you off. It's awesome. I promise.

super moist chocolate cake
ingredients:
3 c. all-purpose flour
3 3/4 c. sugar
1 1/4 c. unsweetened cocoa powder (the richer the better)
3 tsp baking soda
1.5 tsp salt
1 1/2 c. neutral vegetable oil (I use sunflower oil)
1 1/2 c. sour cream
2 c. water
3 tbsp distilled white vinegar
2 tsp vanilla extract
2 eggs

Preheat your oven to 350 F. Spray the base and sides of 3 x 9-inch round pans with some non-stick spray. Set aside.

Sift (yes, I've started sifting...) together the flour, sugar, cocoa powder, baking soda and salt in the bowl of your stand-mixer. Use your paddle attachment to combine well.

Add the oil and sour cream and continue to blend. Gradually beat in the water (I added it half a cup at a time) and then add the vinegar and vanilla. Grab your eggs and whisk them in a small bowl. Once whisked, add to the batter. Make sure that your batter is well blended, scraping down the sides of the bowl as necessary.

Divide the batter evenly between the 3 pans. Bake for between 35 - 45 minutes... a wooden toothpick should come out almost clean: remember, this is a moist cake. Allow the cakes to cool in the pans on a wire rack (I let them sit for about 30 minutes). At that point, take them out of the pans and allow them to cool completely.

Simple eh? Yep. Now... you can either decide to wrap each layer really well in plastic wrap and stick them in the freezer to firm up OR you can work with them as they are. Your choice. If you freeze them, then take them out as you start on your butter cream -- that will give them a chance to thaw a little before icing them. Do whatever you are comfortable with.

I played around with my raspberry butter cream frosting, using fresh raspberries since I could pick them up in the market ;0)

I like to stack my cake layers before making the fudge frosting. It gives them a chance to sit a little... but that's just my preference.

Now for the chocolate fudge frosting. Probably the easiest thing ever. You only need two ingredients... sour cream and chocolate. That's it.

chocolate fudge frosting
ingredients:
13 oz bitter and semi-sweet chocolate combo, finely chopped
500 ml (one large container) of full-fat sour cream

Melt the chopped chocolate in a double boiler over simmering water, stir until smooth. Once melted, allow it to cool until it is just warm to the touch.

Grab a large spatula and fold in the sour cream -- only until no white streaks remain... otherwise the frosting becomes too thick. You know it's ready because it'll look really silky. Best to use it right away... but I've heard it's pretty awesome for dipping cookies in ;0)

At this point your cake should be filled with butter cream and staked. Grab your spatula and spread your frosting evenly over the entire thing - start at the top and spread out, the frosting will naturally slip to the sides for easy coverage.

I then "dressed" it up a bit by grabbing a small spoon, dipping it in water and making swirls all over it... super easy and everyone will be really impressed.

A perfect cake to celebrate some awesome people. oh... and the decorative strawberries are thanks to Kshonze :0)

Sweetness.

Wednesday, May 19, 2010

chocolate and root beer... Manu's favourite combination


You remember Manu right? Of baking sausage and cheese bread fame? I thought I would share with all of you his favourite dessert combination. You see, Manu loves, loves... LOVES root beer. It's the only type of soda he drinks, given the chance to have a soda; and he especially enjoys the one I'm about to share with you... an extra thick, super creamy brand... I use it as my "secret" recipe in the following cake.

You might be wondering why I'm making Manu the theme for this blog entry? Well you see, Manu is turning 10 in a few days... TEN!!!! You know what that means? He is leaving the world of single digits behind and joining all of us in the exciting land of the double digits!!!! I can clearly remember my tenth birthday; my parents wanted me to have an "extra special" cake: so they asked a family friend to make me a "professional" cake - in the shape of a sheep, with fondant icing... it certainly was memorable, but more because none of us (imagine a gaggle of ten-year old girls) enjoyed the thick butter cream frosting, nor the fondant... and felt horrible cutting into a little sheep!

So I figured I would share this cake recipe with Manu's mamie, fabulous aunt,and papa - all of whom I know would love nothing better than to make this little hobbit happy and bake him a cake he'll remember (and love to eat)!!!
Expect an intensely rich, moist, dense, chocolaty cake... with a hint of root beer. I've made this several times and have discovered the secret. You need to use 2 cans of root beer - the best, most organic quality you can find. Then you need to use it in the cake batter and in the frosting... and finally, you need to serve it with some whipped cream. Fresh vanilla whipped cream; it cuts the sweetness and actually reinforces the idea that this is a root beer float cake!
note: the flavour really comes out as this cake sits... so making it a day in advance is not only a good thing... it's strongly recommended ;0)

Root Beer Cake
ingredients:
2 c. root beer
1 c. dark unsweetened cocoa powder
1/2 c. butter
1 1/4 c. sugar
1/2 c. dark brown sugar
2 c. all-purpose flour
1 1/4 tsp baking soda
1 tsp salt
2 large eggs

Preheat your oven to 325 F. You can either bake this recipe in: a bundt pan, mini bundt pans (they look like big donuts that way - and you end up with 12) or a round pan... I was able to make one 6-inch round and two 5-inch rounds with this recipe. Obviously, anything goes - just spray with cooking spray and set aside.

In a medium saucepan over medium heat, combine the root beer, cocoa powder and butter until the butter has melted. Add the sugars and whisk until they've dissolved. Remove from heat and allow to cool.

Meanwhile, in another bowl, combine the flour, baking soda and the salt. Set aside.

Once your root beer mixture has cooled a little, beat the eggs and temper them with about 1/2 c. of the batter (you don't want them to curdle). Add the tempered eggs to the saucepan and whisk until well combined. Gently fold in the flour mixture (I used my whisk, I just was gentle). Don't worry if the batter is lumpy. Lumps are good and the batter is very loose.

Pour the batter into whatever baking pan you've picked and cook for 35 - 45 minutes. Once baked (your knife tip should come out clean when inserted in the centre), allow to cool on a wire rack.

Now for the frosting... I'd like to say that the measurements are completely accurate... however, as is the case with me making butter cream, I tend to add more of this and that as I go along... until it looks as thick as I want it to look, and tastes as sweet as I want it to taste.

Root Beer Frosting
ingredients:
1/4 to 1/2 c. butter at room temperature
1 tsp salt
1/4 - 1/3 c. root beer
1/2 c. unsweetened cocoa powder
2 1/2 - 3 c. powdered sugar

In the bowl of your stand mixer beat the butter (use your paddle attachment). Add the cocoa powder, continue to beat. Toss in the salt, about 2 cups of the powdered sugar and 1/4 c. of the root beer. Keep beating until smooth... this is when I added more root beer for flavour and powdered sugar to thicken it up.

Once done, spread on top of your cake... whip up some whipped cream or scoop out some ice cream... and there you have it... A cake fit for a newly turned 10 year old, as well as all children at heart...

A root beer toast to you Manu, on your special day! And yes, I know it's not until the 25th of May - but this way I've given everyone who loves you a chance to make you your favourite cake! :0)

Wednesday, March 31, 2010

and she decreed... "let there be cake"


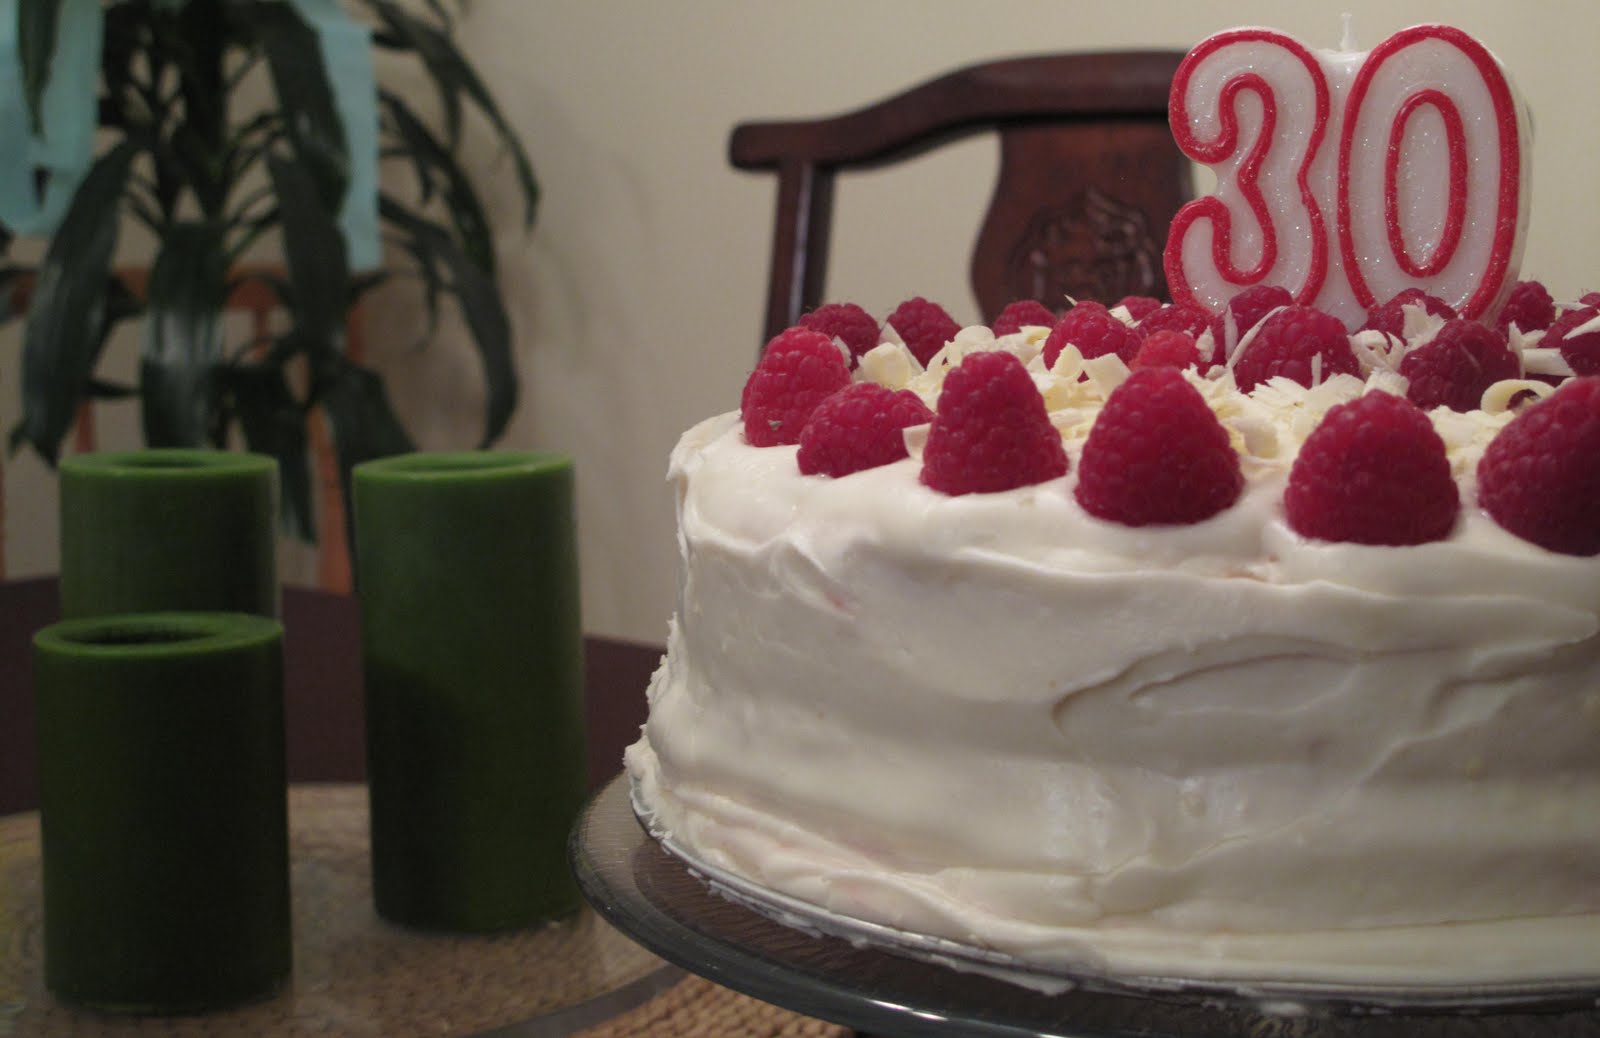
Last Friday was Gigi's birthday. Yes, that's right, the BIG 3-0. We celebrated with sushi, wine, beer and lots of laughter. And then as Marie Antoinette decreed, we had cake!

I decided to stay away from a dark or milk chocolate cake and baked a two layered white chocolate cake, filled with a raspberry buttercream (shockingly pink yes, but oh so delicious), covered with a cream cheese buttercream and then decorated with fresh raspberries and shaved white chocolate. Yes it tasted even better than it sounds...

The cake is dense enough to hold all that buttercream, and the tangyness of the cream cheese frosting balanced the sweetness from the raspberries. So much butter. So much sugar. So perfect! A little side note - it's best to bake the cake a day ahead - so that it has the chance to completely cool before being frosted.

Happy Birthday Gigi :0)

Essential White Chocolate Cake
to make two 9 x 2-inch round cake layers
ingredients:
2 ounces white chocolate, finely chopped
3 1/2 cup cake flour
1 tbsp + 1 tsp baking powder
1/2 tsp salt
6 egg whites, at room temperature
1 1/2 c. whole milk, at room temperature
1 c. butter, at room temperature
1 1/2 c. sugar
2 tsp vanilla

Preheat your oven to 350 F. Spray your two 9 inch rounds with nonstick spray and set aside.

Sift together the flour, baking powder and salt; set aside. Toss in the chopped white chocolate. In a medium bowl whisk together the egg whites and milk; set aside.

In the bowl of your stand-mixer, with the paddle attachment, beat the butter until soft and creamy (approx. 4 minutes). Add the sugar and beat until very light and fluffy - increase the speed from "stir" to about a 4. Scrape down the bowl a couple of times (beat for about 5 minutes). Add the vanilla.

Add the flour in 4 additions, alternating between the flour and milk/egg mixture, starting and ending with the dry ingredients. You want to beat until smooth on the stir speed after each addition.

Divide the batter evenly between the pans and smooth the tops (I tap my pans against the counter to get all the air bubbles out and it also levels out the batter). Bake for 35 minutes. Cool in the pans for about 10 - 15 minutes. Then remove them and allow to cool completely on wire racks.

Wrap in plastic wrap and store at room temperature if assembling within 24 hours.

Raspberry Buttercream
*everything here is estimations... since I really was playing it by ear
ingredients:
1/2 c. butter, room temperature
3 - 4 c. powdered sugar
1 - 2 tbsp raspberry syrup
1 1/2 c. raspberries, fresh or frozen

In the bowl of your stand-mixer you'll cream the butter and half the powdered sugar together - as it blends you should increase the speed. Then slowly add the syrup - I really did just estimate - no measurements when adding this ingredient. Add more powdered sugar to increase the volume of your frosting. Keep beating - this could mean that your stand-mixer is going to run for about 10 minutes... but that way you end up with that really fluffy, creamy texture and that's when you'll want to toss in your raspberries. Keep beating - especially if you are using frozen berries, so that the frosting loosens up and is easily spreadable.

The result is a bright pink buttercream with flecks of raspberry pieces tossed within.

Keep it at room temperature so that it is easy to spread (unless making ahead, then store in an airtight container in the fridge, and re-beat prior to using it to loosen it up again).

Grab your cakes, level them out (use a serrated knife) and spread a thick layer of the buttercream over the bottom layer - seriously, go to town with this - the more the happier your taste buds ;0) Then top with your second layer of cake.

Step number 3 (almost done... promise)

Cream Cheese Buttercream Frosting
ingredients:
1 package cream cheese (block), at room temperature
1/4 c. butter, room temperature
4 - 6 c. powdered sugar
1 - 2 tbsp whole milk
2 tsp vanilla

Grab that stand-mixer again! Using the paddle attachment, beat together the cream cheese and the butter (do this for about 3 minutes). Add half of the powdered sugar and increase the speed as everything combines, adding the vanilla and a bit of the milk - you want to reach that creamy, fluffy and smooth texture - so just the mixer going, adding more powdered sugar as you need it. I strongly encourage the taste-test method... taste the frosting as you make it; you don't want an overly sweet buttercream, you really want the tangy taste of the cream cheese to shine - it balances the overly sweetness of the raspberry buttercream.

I let the mixer go for about 10 minutes before I thought that the frosting had reached the proper consistency and flavour combination. Then I grabbed my big knife and spatula and covered the entire cake with a thin layer - this was a very thin layer that just got all the crumbs. Once that was done, I took the remainder of the frosting and completely covered the rest of the cake... a nice thick layer of frosting. Top with your fresh raspberries (a pint should do) and some shaved white chocolate (I used my vegetable peeler to shave some white chocolate onto the top of the cake).

I think even Marie Antoinette would have approved. A seriously awesome cake. I promise.

Tuesday, January 26, 2010

the white nut... the coconut!


The cupcake. A perfect treat for any occasion. Especially a birthday celebration! I made this mini little treats as an extra dessert for Céline's Thai themed party (the birthday cake was the mango-ginger cheese cake).

It was the first time I had tried any recipe from my new cupcake cookbook... some people liked the result (I being one of them), some people weren't too keen... so I guess I'll leave it up to you to decide.

I turned to cupcakes; a fine selection of sweet treats for my baking inspiration that cold January day... the pictures are absolutely beautiful, the flavour combinations make my mouth water... and since I had just bought the book, I figured I should give it a chance. I'm glad I did. The trick with cupcakes is not over baking them... I think I left these in a little too long... I'll remember that the next time I attempt to bake them.

Fluffy Coconut Cupcakes
ingredients:
2 c. self-rising flour
1/2 c. flaked coconut
1 c. white sugar
1 c. buttermilk
2 eggs, lightly beaten
1 tsp coconut extract
4 1/2 oz butter, melted

Preheat your oven to 350 F. Line 36 mini muffin cups with paper liners.

In a medium sized bowl, combine the buttermilk, eggs, coconut extract and melted butter together.

In the bowl of your free standing mixer with your paddle attachment, combine the flour, coconut and sugar. Make a well in the centre and pour in the wet ingredients.

The batter will become quite thick and fluffy - resembling almost a pancake batter.

Divide the batter evenly among the paper liners - about 2 tablespoons per mini cupcake liner.

Bake for 12 minutes (this is where I over baked a bit... no more than 15 minutes!) , remove from the pan and transfer to a wire rack to cool completely before frosting each cupcake.

Coconut Frosting
ingredients:
2 1/4 c. icing sugar
1 1/2 c. flaked coconut
2 1/2 oz butter, softened
1/2 tsp coconut extract
2 tbsp - 1/4 c. hot water


In the bowl of your stand mixer (use your paddle attachment again), combine the icing sugar and coconut. Add the butter, coconut extract and enough hot water to make a spreadable icing, adding it by the tablespoon.

Once the frosting is ready, place it in a piping bag (about 1/4 c. at a time), grab a tip that is quite large so that the icing can be piped easily. Pipe the icing and then (optional) sprinkle with toasted coconut flakes to decorate.

I think these cupcakes were adorable... one-bite treats for everyone to enjoy.

Wednesday, January 6, 2010

the best cupcakes ever...according to my fan


I had a really awesome New Year's Eve... I spent the day playing in the snow with some of my favourite people... giggles and big smiles were the order of the day!

So when we all came in for our celebration dinner I wanted to quickly whip up a little treat for the little hobbits... cupcakes seemed like the perfect dessert. Not only did they turn out (and I was able to use some left over frosting from a cake I'd made the day before) but I was informed that I make the "best cupcakes ever"... :0)

I won't lie - I'll take the compliment and share the recipe with all of you... after all, don't we all like to think we make the very best cupcakes? Try this one and you should be hearing the same rave reviews.

Lemon Cupcakes
ingredients:
1 1/4 c. all-purpose flour
1 tsp baking powder
pinch of salt
1/2 c. butter at room temperature
1 c. sugar
2 eggs
zest and juice of 1 lemon
1 tsp vanilla extract
1/2 c. whole milk

Preheat your oven to 350 F. Line your muffin pan with 12 cupcake liners (large sized). Set aside.

In a medium sized bowl, stir together the flour, baking powder and salt. Set aside.

In a larger bowl and with your electric mixer (I wasn't at home and didn't use my stand mixer... but obviously you could use yours with the paddle attachment), beat together the butter and sugar (medium speed) until smooth and light in colour (2 minutes).

Add the eggs, one at a time, beating each into the batter. Add the lemon juice, zest and vanilla extract to the mixture and continue to beat for another minute or so.

At a low speed, and in 3 additions (3 flour, 2 milk), add the flour and milk alternately to the batter (beginning and ending with the flour). You want to combine everything but not over mix... so as soon as it's smooth you're good to go!

Fill each paper liner with the batter (about 3 tablespoons worth). Bake for 20 minutes, or until the toothpick comes out clean.

Cool the cupcakes in the pan for 10 minutes, then remove them from the pan and cool completely on a wire rack (I actually cooled mine on the counter-top... no wire racks, but they still turned out A-OK).

Once they have fully cooled you're ready to frost them!

Beware... I actually halved the recipe below (I'm giving you the complete recipe) and ended up with enough frosting to fill a 9 inch layered cake (the filling between the layers) AND half of these cupcakes... plus I still have some frosting in my fridge. It seems to go a long way... or maybe I just don't put enough frosting on my cupcakes!? But at least we know that it'll keep in a air-tight container in the fridge for up to 3 weeks.

Classic Chocolate Frosting
ingredients:
3 ounces unsweetened chocolate
2 1/2 c. powdered sugar
1 tbsp plus 1 1/2 tsp unsweetened cocoa powder
1 1/2 c. butter at room temperature
1 tsp vanilla extract
1/2 c. heavy cream, at room temperature (briefly heated over low heat)

Put the unsweetened chocolate into a heatproof bowl over a pot of simmering water (1 inch deep). Stir the chocolate until it is melted and smooth. Remove from heat and set aside to cool slightly.

Meanwhile, in the bowl of your stand mixer (you'll use your paddle attachment for this recipe) combine the powdered sugar, cocoa powder and butter - beat at a lower speed for a couple of minutes - you want a smooth texture. Beat in the melted chocolate, adding the vanilla and cream. Beat until everything is super smooth; about 3 minutes. The result should be a nice thick consistency, easy to smooth onto your cupcakes with a butter knife or to pipe on with a piping bag.

Top with sprinkles and your cupcakes are good to go!

Note:
If your cream wasn't at room temperature, you could have quickly warmed it on low heat in a saucepan...

I thought I'd used low heat... but apparently now low enough and I ended up with the following dilemma.... the hot cream melted the butter in the frosting! I was able to solve that problem by chilling the frosting in my fridge for 30 minutes...
the butter solidified and the frosting was ready to be used!

I also used my Lemon Meringue butter cream frosting (July blog)... I had topped and iced a cake with it and had some left over from that too. Cupcakes seem to be the best way to use up my left-overs and make very happy hobbits ;0)

Tuesday, December 29, 2009

merry christmas y'all... better late than never!


I know... I'm late. I'm wishing you a Merry Christmas as we all get ready to pull out the bubbly and celebrate the New Year! I meant to upload some recipes over the course of the month... as inspiration for your own holiday baking... obviously, I didn't really succeed. I baked. A lot. So I'd like you to accept my apology and imagine me slaving behind my kitchenaid and oven preparing my goodies in order to gift them to my loved ones.

My papa called me early on in the month and we confirmed that I would be responsible for our Christmas desserts. I was also informed me that my step-mother, Marielle, wouldn't be baking sweets; that I would be the sole provider of goodies for several days of holiday celebrations. Talk about pressure! (btw, Marielle did bake - and made probably the best tortière I've ever tasted - everything was wonderful)

So amongst the mayhem of my kitchen I pulled out my camera, tried some new recipes and am ready to upload them and share them with all of you. They aren't all necessarily simply Christmas baking ... these cupcakes I'd call winter cupcakes - a beautiful white cupcake iced with a white chocolate cream cheese butter cream... sounds just about perfect for a cold January day :0)

Winter White Cupcakes
ingredients:
1 1/4 c. all-purpose flour
3/4 tsp baking powder
1/8 tsp salt
3/4 c. buttermilk
1 tsp vanilla extract
1 vanilla bean, scraped and seeds removed
1/4 tsp pure almond extract
3/4 c. butter, room temperature
1 c. white sugar
3 large egg whites, room temperature

Preheat your oven to 350 F. Depending on how big you want your cupcakes, you can line muffins tins with cupcake liners for either 12 or 24 cupcakes (I was able to make 24 regular sized cupcakes... not too big, just the perfect size to enjoy after indulging in copious amounts of food).

Sift together the flour, baking powder, salt and vanilla seeds together in a medium sized bowl. In a smaller bowl, combing the buttermilk, vanilla and almond extracts together. Set both bowls aside.

In the bowl of your stand mixer, beat together the butter and sugar - start at a lower speed, increasing the speed to get that fluffy texture and lightness in colour (about 3 minutes).

On low speed (Stir) and in 3 additions, add the flour and milk mixtures alternately, beginning and ending with the flour mixture (3 flour, 2 milk). Mix until the flour is just incorporated and the batter looks smooth. Set aside.

In a large glass bowl and with clean beaters (I used my electric hand-mixer for this part), beat the egg whites until foamy (medium speed). Increase the speed to high and continue beating until the egg whites look shiny and smooth; the egg whites will cling to your beaters when you lift them.

Stir 1/3 of the egg whites into the batter. Once incorporated (do this quickly so that the egg whites don't loose volume), grab your rubber spatula and fold the remaining egg whites into the batter. Just blended.

I used my mini ice-cream scooper to fill my paper liners - about 2 scoops per liner (that will make 24 cupcakes - 1/3 c. of batter would fill 12 liners).

Bake for about 20 minutes (the toothpick will come out clean when tested in the centre of the cupcake), remove from the oven and allow to cool for 10 minutes in the pan on a wire rack. Remove from the wire rack and allow to cool completely before icing.

White Chocolate Cream Cheese Frosting
ingredients:
3 ounces of white chocolate, chopped
1/4 c. unsalted butter at room temperature
4 ounces of cream cheese at room temperature
3/4 vanilla bean, scraped and seeds removed (or 1 tsp vanilla extract)
1 1/2 c. powdered sugar
1 - 2 tbsp milk, half & half or cream... whatever you have on hand.

In a double boiler melt the white chocolate to smooth (heatproof glass bowl over a pot of 1 inch simmering water). Use your wire whisk to stir the chocolate smooth. Transfer to the bowl of your stand mixer.

Add the butter, cream cheese and vanilla (either the seeds or the extract) and, using your paddle attachment, beat to smooth (1 minute or so). Add the powdered sugar, mixing until the frosting is smooth. This is when I add the half & half (or milk or cream)... it loosens up the frosting just a bit; incorporate a tsp at a time.

Use a small spatula or a butter knife to spread about a tbsp or so of frosting on every cupcake. If you want to make these really decadent, top with white chocolate curls.

A prefect blend of butter cream and cream cheese frosting... not too heavy, and the white chocolate surprises people too. This frosting went really well with my white chocolate almond mini bundt cakes (January 2009 entry) too... you have to love multi-purpose baking recipes!

Wednesday, November 18, 2009

I decided to bring Starbucks home with me...


I have to admit... when it comes to lattes, I'm a sucker for Starbucks. Every time I stand in line waiting for my grande soy latte I look at the baked goods on display and think... "I can totally do better than that!"... and so began last week's baking challenge. I decided to bake up a batch (or three) of Starbucks' classic Cranberry Bliss Bars and their Banana Walnut Bread.

I think in the end I did really well... the bars ended up with a bit of a thicker brownie crust than I would have liked - but I now know what I'll do next time... and believe me, there will be a next time. I can understand why these are such a hit in the coffee shops around the holidays - they look so festive when assembled - and taste as good as they look!

You have to be a little proactive with this recipe... the frosting calls for softened cream cheese - so be sure to take it out of the fridge and allow it to come to room temperature (ditto for some of the butter). And... you have to be patient... things need to cool before you can continue to assemble, but it really is worth the time and effort. I promise... after all, if I can be patient enough to do this, you can too!

Cranberry Bliss Bars

The Base
ingredients:
1 c. butter, melted
1 c. brown sugar
1/3 c. white sugar
3 eggs
2 tsp orange extract
2 c. flour
1 1/2 tsp baking powder
1 tsp ground ginger
3/4 c. dried cranberries
3/4 c. white chocolate chips

Preheat your oven to 325 F. Prepare a 9x13 rectangular pan with non-stick spray. Set aside.

Allow the melted butter to cool slightly. In a large glass bowl and with your electric mixer, beat together the melted butter and sugars for 3 - 5 minutes until light. Gently blend in the eggs (1 at a time) and orange extract with the mixer at low speed. Add the flour, baking powder and ginger, just incorporating. Add the cranberries and chips - folding in with a wooden spoon.

Spread the batter into the pan (it'll be thick, that's ok). Bake until the skewer test comes out clean - my oven took about 45 minutes - but I started checking @ 29 minutes... since I didn't want to over bake and dry out the brownies.

Allow the brownies to cool in the pan for about 10 minutes. Remove them from the pan and cool completely on a wire rack.

While they are cooling start on your frosting.

Cream Cheese Frosting
ingredients:
3.3 ounces cream cheese, room temperature
2 tbsp butter, room temperature
3 c. powdered sugar
1 tsp orange extract
3 tbsp half & half (or milk - whatever you have on hand)

Add your paddle attachment to your kitchenaid and blend the cream cheese and the butter until fluffy (about 3 minutes @ speed 4).

Add the orange extract and the powdered sugar and beat until you get that fluffy and spreadable frosting - adding the half & half a tbsp at a time; use your judgement in adding the liquid... it'll give you that looseness you need to create a spreadable frosting.

Spread the frosting over the cooled brownie bass.

Now for the fun... garnish these babies :0)

The Festive Garnish
ingredients:
1/2 c. dried cranberries, roughly chopped
zest of 1 orange
1/3 c. white chocolate chips
1/2 tsp vegetable oil

Zest your orange and roughly chop your cranberries. Sprinkle them both over the frosted base.

Mix the white chocolate chips and vegetable oil in a glass bowl over a simmering pot of water. Allow the chocolate to melt - stir as needed.

Using either a whisk or a fork, drizzle the melted chocolate over the bars. Allow the white chocolate to set for one hour before you cut them. I wanted the "traditional Starbucks triangles", so I cut the base in 3 columns and then 4 rows and then cut each of those squares in half diagonally to create the triangles.

Simply beautiful and really impressive.

Next time: I'll be using a 10x15 rectangular pan for a thinner brownie base... and I'm also going to exchange the orange extract for vanilla and swap out the orange rind for crystallized ginger... just to twist it up a little more.

Here's to the beginning of the holiday season... cheers!

Tuesday, October 27, 2009

another daring challenege... mais en français!


I have something to confess... whenever I used to hear the word macaroons I always thought of those stiff meringue nests that people seem to really enjoy eating (I'm not one of those people). So when I saw that I was being asked to bake several dozen macaroons for the October DB Challenge my heart sorta sank... and then I realized how erroneous I had been.

These cookies aren't hard and ridiculously sweet... they resemble more of a cookie sandwich - two light cookies bound together with a buttery filling. The best part of this challenge was that we were all encouraged to use whatever flavour profile we wanted.

I was divided... lemon cookies with a lemon cream cheese filling OR chocolate with a peanut butter filling. Oh what to do! Such a dilemma...

Since I had baked my 3 layered lemon cake over the weekend I decided to opt for the peanut butter. I don't regret that choice at all. I ended up with some beautiful cookies and the creamest, buttery filling. Delish!

The 2009 October Daring Bakers’ challenge was brought to us by Ami S. She chose macaroons from Claudia Fleming’s The Last Course: The Desserts of Gramercy Tavern as the challenge recipe.


Chocolate Macaroons
ingredients:
2 1/4 c. icing sugar
2 c. almond flour
3 tbsp cocoa powder
2 tbsp white sugar
5 egg whites, they must be at room temperature

Preheat your oven to 200 F. Line your cookie sheets with parchment paper. If you don't have any, do not grease your pan... the cookies need to be quite dry.

In a large bowl, combine the icing sugar, cocoa powder and the almond flour. Set aside.

In the bowl of your stand-mixer start whisking the egg whites (with the whisk attachment). Start at a lower speed, increasing until about speed 8. At that point your egg whites should have formed soft peaks. Add the 2 tbsp of sugar and increase the speed to level 10. Continue whisking until you get to the stiff peak stage.

Take the mixer bowl off the stand-mixer and gently fold in 1/3 of the almond-icing sugar combo. Sift in the remaining almond flour in 2 batches. Be gentle and don't overfold - just fully incorporate the ingrendients.

Place the batter into an icing bag (or ziplock bag). Use either a large tip or cut off the corner of the bag in order to pipe the batter onto the cookie sheet. You want to pipe them into one-inch mounds so that they form little circles.

Bake the macaroons for 5 minutes. Remove the pans from the oven and raise the temperature to 375 F.

Once the oven has reached that temperature, return the pans to the oven and continue to bake for another 7 minutes. Cool the cookies on a wire rack before filling them with the icing.

*I was able to get about 3 dozen cookies out of this batch - but I also didn't have a proper piping bag (or ziplock bag) - so I ended up with some bigger macaroons that I would have otherwise.

A Sweet & Salty Peanut Butter Filling
ingredients:
125 g natural peanut butter
70 g icing sugar
25 g softened butter
25 g milk
5 g vanilla extract
3 g fine sea salt

In your mixing bowl (use a paddle attachment for the kitchenaid) cream together the butter and peanut putter at a medium speed. Add the icing sugar and salt and incorporate into the batter. Reduce the speed to low and add the vanilla; finishing with the milk being incorporated, about a tbsp at a time.

Pipe the peanut butter onto the base of one of the macaroons and top with another. Store in an airtight container... if they even last that long!

Wednesday, October 7, 2009

double the trouble


These brownies are the best. Seriously the B-E-S-T. I've already made two batches. In 24 hours. Tells you something eh? These are the sort of brownies that you make if (1) you have a sweet tooth and (2) don't have diabetes. These are fudgy, moist and topped with pecans and toffee... and take all of 5 minutes to whip up. In one word - PERFECT (prepare to moan while eating these). Take a chance and try these... believe me, they are worth it.

Chocolate Fudge Brownies
ingredients:
4 squares unsweetened chocolate (1oz)
1/2 c. butter, room temperature
1 1/2 c. brown sugar
3 eggs
2 tsp vanilla
3/4 c. all-purpose flour
1/2 c. chocolate chips

Preheat your oven to 350 F and grease a square-baking pan (8 inch). Set aside.

In a large, heat resistant bowl, melt the chocolate and butter together over a simmering pot of water (on low heat). You can help this along but stirring every once and a while, but really, just leave the two to melt. Once the mixture is smooth, remove from heat and allow to cool slightly.

With a wire whisk, add the sugar to the melted chocolate. Whisk together to smooth. Then add the eggs (one at a time) and the vanilla, incorporating them fully into the batter. Now grab your wooden spoon and fold in the flour. You want to just incorporate it. Now add in the chocolate chips. That's it. Time to pour the batter into the waiting pan.

Bake in your oven for between 25 - 35 minutes - depending on your oven (mine was close to 25 minutes). You want the brownies to be set, but not dry - otherwise you lose that fudgy effect.

Allow to cool in the pan on a wire rack.

Now to add that extra layer of decadent sweetness to these babies.

Sticky Toffee Pecan Topping
ingredients:
1/2 c. butter (1 stick), room temperature
2/3 c. condensed milk
1/4 c. brown sugar
1 tbsp corn syrup
1/2 c. pecans

In a small saucepan over medium heat melt the butter. Then add the condensed milk, sugar and corn syrup. Cook for 4 to 7 minutes stirring continuously so that it doesn't stick to the pan.
Once you get a very smooth and golden topping, remove it from heat and allow it to cool and thicken slightly.

Spread over the brownies with a palette knife. Take the pecans and scatter over the top of the brownies and toffee. Leave at room temperature for about 30 minutes, then cut into squares and store in the fridge... you should get 25 brownies out of these.

Truly decadent. Sigh. These are winners through and through. Enjoy!

Sunday, August 30, 2009

Daring Bakers Challenge....Dobos Torta...sigh

Oh woe is me... if you know me, then you know I have a tendency to sigh - great, loud sighs. So imagine me typing this and sighing. Yep - this challenge left me shaking my head while I licked my spatula and wondered why I was unable to properly follow a recipe.

I'm late in posting my August Challenge. I just lost track of time and baked a whole bunch of other things on my list this past month... leaving this challenge on the sidelines. I will admit that I was so excited when I first received the challenge - a Hungarian speciality - baked in my little kitchen in Ottawa! Yay! Only, it didn't work out as well as the recipe promised. I swear - I tried!!! But alas sometimes it doesn't matter how good the intentions... sometimes, it just doesn't work out :0(

Not to say the result doesn't taste good... I mean, sugar, chocolate and butter combined - it still TASTES good, it's just become a variation of what I had intended.

The August 2009 Daring Bakers' challenge was hosted by Angela of A Spoonful of Sugar and Lorraine of Not Quite Nigella. They chose the spectacular Dobos Torte based on a recipe from Rick Rodgers' cookbook Kaffeehaus: Exquisite Desserts from the Classic Caffes of Vienna, Budapest, and Prague.


This should have been simple enough - a 5 layer sponge-cake with a rich buttercream frosting and topped with thin wedges of caramel. 2 of my 5 layers didn't bake properly. My caramel tasted of lemon. The only thing I was successful at was the buttercream frosting - I mean, whisking sugar and eggs, adding chocolate and then whisking in 2 sticks of butter - yep, rich chocolate frosting was made.. and licked... you have to taste the good rights?

So my end result was a 3 layered sponge cake, with buttercream frosting and pecans. No caramel. No special effects. This means I need to have another go at it another time...

I'll provide you with what I did successfully complete though...

Sponge cake layers
ingredients:
6 eggs, separated, at room temperature
1 1/3 c. icing sugar, divided
1 tsp vanilla extract
1 c. + 2 tbsp sifted cake flour
pinch of salt

Position the racks in the top and centre thirds of the oven and heat the oven to 400F.

Cut six pieces of parchment paper to fit an 9" circle template.

Beat the egg yolks, 2/3 c. icing sugar and the vanilla in a medium bowl with a mixer at high speed until the mixture is thick, pale yellow and form thick ribbons with the beaters are lifted out of the batter (3 minutes).

In another bowl, using clean beaters, beat the egg whites until they form soft peaks. Gradually beat in the remaining 2/3 c. icing sugar until the whites form stiff, shiny peaks. Using a large rubber spatula, stir about 1/4 of the beaten whites into the egg yolk mixture. Fold in the remaining egg whites, leaving a few wisps of white visible.

Combine the flour and salt. Sift half of the flour over the eggs, fold in, and then repeat with the remaining flour.

Line a baking sheet with one piece of the parchment paper that has the circle template. Fill the circle with about 3/4 c. of the batter (fill in the traced circle with the batter using a spatula). Bake on the top rack for 5 minutes. Remove it from heat and place on a wire rack to cool. Meanwhile, bake the remaining layers, one at a time, 5 minutes each on the top rack. Allow all of the layers to cool completely.

Grab an 8" circle round to trim the layers so that they are all the same size and shape.

While they are cooling you can start on the frosting.

Chocolate Buttercream
ingredients:
4 large eggs, at room temperature
1 c. white sugar
4 oz (110g) dark chocolate chips or chocolate finely chopped
2 sticks butter, at room temperature

Bring a large saucepan with an inch or so of water to a boil, bring it down to a simmer. Once the water is ready, combine the eggs and sugar in a large glass bowl. Place the bowl on top of the pot (without the water touching the bottom of it) and whisk the eggs and sugar together (I use my electric beaters for 3 minutes).

Add the chopped chocolate to the egg mixture and continue beating the batter for another 3 minutes (over the simmering water). Remove from the heat, pour into a clean bowl and allow the batter to cool down a little.

Once it's reached room temperature, slowing start to whisk the mixture adding the butter about 2 tbsp at a time - you'll notice that it will slowly thicken. Keep your beater going until all the butter has been incorporated. Place the frosting into the fridge to chill - it will thicken up (leave to sit for about an hour). When you're ready to assemble the cake, remove the frosting from the fridge and allow it to sit for a little bit before using it.

Now this is where everything really fell apart for me (even though by this point I'd already lost 2 of my sponge layers)... I followed the recipe for the caramel and ended up with a sticky lemon syrup - really not the best way to highlight this dessert... so I dumped it and continued to assemble my layers...

I put some of the buttercream on the serving plate and spread it out a little. I then placed the bottom layer on top of it (the buttercream allowed the cake to adhere to the plate and not move). Spread more of the frosting between the layers - cake, frosting, cake, frosting, cake and then more frosting. You'll want to spread some of the buttercream around the sides as well. I then grabbed some whole pecans and placed them on the sides and top of the cake.

Totally not how it was supposed to turn out... but like I said before, it still tasted rich and delicious... even through all the sighs :0)

Tuesday, August 25, 2009

the "thank you" cupcake


I work with some pretty amazing people. They work really really hard - and have to put up with all sorts of last minute changes and high stress... so whenever I can, I bake "thank you" treats - so far they've been given brownies, double chocolate cookies, and cake. Today I brought in my lemon butter cookies and cupcakes - banana and toffee to be precise :0)

Another reason for these treats is that one of my co-workers is going on maternity leave - a little boy to add to her little clan - and so I wanted to make sure that Vero knows how much we all appreciate her and wish her an amazing year with her little ones.

The recipe was inspired from my Cupcakes recipe book by Sue McMahon. I have to warn you all, I ended up using my scale since her measurements are in grams and ounces... I meant to convert them for all of us North Americans... I just lost track - note: always keep a pen handy for notes and adjustments... lesson learnt!

cupcake and frosting recipes follow - I adjusted from the original adding some roasted walnuts and chocolate chips to the sticky toffee frosting... DELISH!

Banana Cupcakes
ingredients:
100 g butter, room temperature
100 g brown sugar
2 eggs
100 g self-rising flour
1 ripe banana, mashed (I thawed a frozen banana)

Preheat your oven to 375 F. Line a muffin tin with 12 paper liners. Set aside.

In a large bowl, beat the butter and sugar together until the mixture becomes light and fluffy. Add the eggs and beat into the batter. Add the flour and incorporate into everything using your electric mixer. Once the batter is smooth, fold in the mashed banana.

Divide the batter into the paper liners - about a scoop and a half in each cup. Bake for 15 minutes. Remove from heat and cool on a wire rack (remove from the tin).

Sticky Toffee Frosting
ingredients:
100 g butter, room temperature
125 g sweetened condensed milk (about 1/3 of a 300 ml tin)
50 g brown sugar
1 tbsp corn syrup
handful of walnuts, roasted and chopped
handful of dark chocolate chips

In a small saucepan over medium heat melt the butter. Now add the condensed milk, brown sugar and corn syrup - and whisk non-stop for the next 7 minutes. You want the mixture to thicken up and turn a golden colour - but keep whisking it otherwise it'll stick to your pan.

Remove from heat and allow to sit for about 10 minutes - it'll thicken a bit more. Then grab a spoon or palette knife and spoon on top of the cooled cupcakes. Spread evenly and then top with walnuts and chocolate chips.

There it is - a simple way to thank awesome people... and wish Vero a very wonderful year... we'll all miss you!

Monday, August 24, 2009

I scream, you scream, we all scream for... CUPCAKES!


I had a very special birthday to plan for - Jeremie was celebrating his 12th birthday. I knew that I wanted to make something not only delicious, but different. I wanted Jeremie to be really wowed by his birthday treat...

I discovered Ice Cream Cone Cupcakes on the now extinct cupcake bake shop blog and just knew that this was the recipe I was looking for. Quirky and fun and very chocolatey- perfect for Jeremie.

Happy birthday! And for those of you wondering if these are worth it - he ate two for breakfast :0) (I'd say that's a success).

Chocolate Cupcake Cones
ingredients:
24 flat bottomed ice cream cones
2 c. pastry flour
2 c. brown sugar
1/2 c. cocoa powder
1 1/2 tsp baking soda
1 1/2 c. milk
1/2 c. butter, room temperature
2 tsp vanilla
2 eggs

Preheat your oven to 350 F. Place the ice cream cones in muffin tins (1 cone per muffin tin hole) - makes it much easier to bake.

Grab a large bowl and dump everything except the eggs directly in. Grab your hand mixer and beat on a low speed until just incorporated. Turn up to a high speed and beat for another 2 minutes.

Add the eggs, incorporating after each one, then beat the entire batter for another 2 minutes (high speed).

Transfer the batter to a container with a pour spout.

Pour the batter into the cones. I made sure that I stopped filling about 1/4 inch under the lip of the cone - allowing room for the batter to expand as it bakes.

Bake for between 20 - 30 minutes (depending on your oven) - you're cake tester should come out clean.

I'm telling you, just at this point in the process you'll be tickled pink with the result... so let them cool on a wire rack and prepare the buttercream frosting.

Chocolate Vanilla Buttercream Frosting
ingredients:
2 sticks butter (1 c.), at room temperature
5 c. powdered sugar
1/4 c. milk
1 tsp vanilla
1/4 c. cocoa powder

In a large bowl, beat the butter until it's creamy. Add the sugar, milk, vanilla and cocoa and beat until everything is well combined. You want the frosting to get thick but not too stiff - you'll be piping it onto the cupcakes - so don't be afraid to add a little more milk if you need to thin it out a little.

Attach a large star tip to your piping bag. Then scoop the frosting into the bag. Pipe it on to the cupcake cones using a circular motion so that it looks like soft serve ice cream. Top with sprinkles if you have any, or even a cherry on-top!

HAPPY BIRTHDAY JEREMIE!!!!! Enjoy the rest of your cupcake cones!

Sunday, August 23, 2009

the virtual picnic... all thanks to Joy (the baker)


My favourite blogger... Joy (I know, I keep saying it about blogs - but joy the baker is seriously my favourite blog) decided to host a rooftop picnic in LA - Since most of her followers couldn't make it (geographic restrictions) she decided to "host" a virtual one at the same time. I decided I was up to the "challenge" and hosted my own picnic at home, here in Ottawa. On the menu - was Joy's Vegan Chocolate Cake with Avocado. I figured since Joy was the hostess with the mostess that I would bake something in her honour from her site.

I know one person for sure who is going to be excited by this recipe... my sister-in-law Pat and I spent last Sunday comparing chocolate mousse recipes - I use tofu for my mousse, she uses avocado. So I hope that Pat (and anyone else reading this) takes the chance to give this recipe a whirl... something different to shock your friends and family with :0)

Vegan Chocolate Cake with Avocado
thanks to Joy the baker
ingredients:
3 c. cake flour
6 tbsp cocoa powder
1/2 tsp salt
2 tsp baking powder
2 tsp baking soda
2 c. brown sugar
1/4 c. sunflower oil
1/2 c. soft avocado, well mashed (about 1 medium avocado)
2 c. water
2 tbsp white vinegar
2 tsp vanilla

Preheat your oven to 350 F. Grease (or spray) two 8 inch round cake pans and set aside.

In a large bowl, combine the oil, avocado, water, vinegar and vanilla - use a wooden spoon and not your electric mixer. Add the sugar, combining well.

In a smaller bowl, sift together the flour, cocoa powder, salt, baking powder and soda. Add to the wet ingredients. Stir everything to incorporate well.

Pour into the cake pans and bake for 35 minutes (or until the cake tester comes out clean). Allow to cool on a wire rack in the pans for 15 minutes - then remove them from the pans and allow to cool completely.

Now to frost the cake. Joy was inspired by Alton Brown's recipe. This frosting really pushes the baking limits - but is absolutely surprisingly good - I know - trust me and try it... and as Kailey said - when you add powdered sugar to anything, it's gotta taste good :0)

Avocado Frosting
ingredients:
2 ripe avocados
2 tsp lemon juice
1 lb (about 5 c.) powdered sugar, sifted
1/2 tsp vanilla

In a large bowl beat your avocados and lemon juice together (use your electric mixers, it makes it all much easier). Beat for about 2 minutes - the avocado will become creamy and will lighten up a little.

Add the powdered sugar, a little at a time, beating at medium speed continuously. Add the vanilla and incorporate well. You can either use it immediately or, place in the fridge (well stored until you're ready to use - same day though).

I let mine stand for 10 minutes on my counter, it thickened up a little. Using a rubber spatula, cover your bottom layer or cake with the frosting, top with the top layer of cake and cover that with with remaining frosting.

The result - a chocolate cake with bright green frosting! Too cool... I think it'll be perfect to try again at halloween :0)

Oh yeah - and the virtual picnic was a BLAST - thanks ladies for joining in the fun! I hope Joy decides to do this again soon
!